okay, pertama sekali. ni tutorial aku guna dalam internet.
and ini tutorial first aku guna.
and bagi aku pun senang jehh :D
takpehh, belum cuba belum tau. JOM !
lets start !
COLOUR CORRECTION PHOTOS
(gambar atas ni kesan apabila dah siap)
- effect ni sesuai untuk gambar permandangan.
In this quick Photoshop tutorial. i'll teach you how to make right color correction on your photos.
In this tutorial I will be using this stock photo of people and snake. Firstly, you should find a nice stock photo to work with. As I mentioned above, I used a nice photo people and snake. Ok open this file and correct the image levels with Image > Adjustments > Levels:
* buka gambar yang nak diedit
* pergi Image > Adjustments > Levels:
* perbezaan graph bergantung kepada jenis gamba
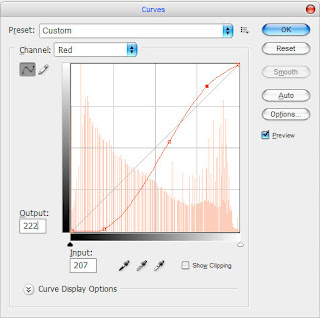
* korang akan dapat gambar lebih kurang macam nihhAfter that correct brightness and contrast using Image > Adjustments > Curves with similar settings to these:
* cuba main-main dengan graph tuhh. bagi warna sesuai.
So, the correction result must be next:(result nya macam nihh)
Now apply brightness and color correction again thru all channels using Image > Adjustments > Curves with similar settings to below:
* lepas semua tuhh. koarng akan dapat gmbar macm nihh
* ok, dah nak habis dah ni
* dapatlahh macam nihh
Now get out the Eraser Tool and a soft round brush (Opacity: 50%, size of 45 pixels) and make a little clean work with this layer. Now we have a picture like this:
* ambil erase dalam (Opacity: 50%, size of 45 pixels), padam dekat object utama gambar
To finish off the color correction apply Filter > Blur > Gaussian Blur:
* lepas tuhh gambar korang jadi macam nihh.
* LAWA dah kan ? tunggu dulu. FINISHING step
* Tukar LAYER MODE (OPASITY 70%)
* korang adjustadjust sikit bagi warna dia MANTAP. HAHA
* GOODLUCK !


No comments:
Post a Comment